Figures need to be drawn for various applications such as the construction of a building, tool design, and other engineering design purposes. To draw such figures, we need the following geometric tools:
- Scale or ruler with ‘cm’ and ‘mm’ mentioned on sides.
- Set-Squares pairs of 30°,60°,90°, and 45°,45°, and 90°.
- Compass with an attached pencil.
- Protractor for angle measurement.
The instruments mentioned above are used for geometrical figure drawing of specific measurements. These figures are mainly drawn using a compass, scale, and protractor. Here we will understand the basic concepts regarding the construction. With those concepts, it will help us in solving construction problems.
Concepts of Geometric Construction
Construction Perpendicular Bisector

Steps for geometric construction:
Step1 – Draw a line AB with a scale.
Step2 – Now take a compass and put a point on A to extend the compass more than half of the line.
Step3 – From the same point A, make a semi-circular arc above and below the line.
Step4 – Repeat the same step at point B without changes in compass extension.
Step5 – You will get two intersected points above and below the line. Name these points P and Q.
Step6 – Now join the line PQ, and you will see we get ∠ 90° at ∠ PMB.
Step7- So ∠ PMB is our Perpendicular Bisector so ,∠ PMB=∠ PMA=∠ AMQ=∠ QMB.
Construction of an Angle Bisector

Steps for geometric construction:
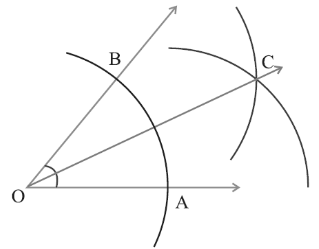
Step1 – Construct a line that bisects an acute angle into two congruent parts.
Step2 – Name the vertex as point O, and we need one more point C to detriment the angle bisector line.
Step3 – Take a compass with an arbitrary extension that intersects the given lines, and we will get points A and B.
Step4 – Now, from points A and B, make the arc to form an intersection point C.
Step5 – Now join points C and O.
Step6 – From OC we get angle bisector ∠COA and ∠COA=∠COB.
Construction of a parallel line

Steps for geometric construction:
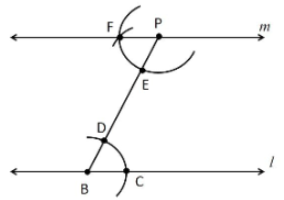
Step1 – In the given line l take any arbitrary point as B.
Step2 – From point B make an acute angle which you prefer using a protractor.
Step3 – Using a compass, make an arc intersecting the lines from vertex B.
Step4 – Name the two intersecting points D and C.
Step5 – Use a compass to measure the distance between D and C.
Step6 – Now with that distance, place it in the line which has point D, and in that choose any position from which you want to make a parallel line.
Step7 – Name it point E and make an arc. Position the compass at some distance and name it as point P such that BD=PE.
Step8 – From point P make an arc such that it intersects the arc. Name the arc intersection point as E and join points P and F.
Step9 – Hence the construction of the parallel line is done.
Construction of Triangle (Right Angled)

Steps for geometric construction:
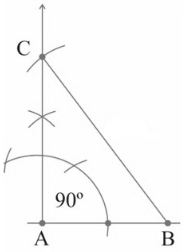
Step1 – Draw a line of the required length AB.
Step2 – Now at point A draw a perpendicular bisector and mark it as point C at the required distance from C.
Step3 – Join points B and C.
Step4 – You now have a basic right-angled triangle.
Solved Example:
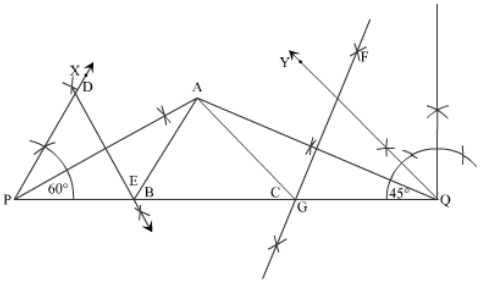
Construct a triangle ABC in which ∠B=60°,∠C=45°,and AB+BC+CA=11cm.
Solution:

Steps for Construction:
Step1 – With a scale draw line PQ=11 cm (AB+BC+CA=11 cm).
Step2 – Now point P using the compass makes a 60° at point P by first making an arc at point P of any arbitrary extension.
Step3 – At the point where the arc bisects PQ, place the compass and again bisect the previous arc, which was made from point P.
Step4 – Now again, make the arc on the left-hand side from the same point and now go to that previous point by bisecting the arc.
Step5 – From that point, bisect the arc on the left-hand side and from point P join it, and a 60° angle is formed.
Step6 – Follow the same steps to further bisect the 60° angle to get 30° angle.
Step7 – Name that line segment as PA and ∠APQ=30°.
Step8 – Now at point Q construct a perpendicular bisector to form a 90° angle at Q.
Step9 – Now using the angle-bisector method make 45° at point Q and name that as line MQ.
Step10 – So we will get ∠MQG=45°, now again by using the angle bisector method make an angle of 22.5°.
Step11 – Extend the angle bisector line to intersect line PA. Now keeping A as a common point the formed line is AQ.
Step12 – Draw perpendicular bisectors DE and AP such that they intersect PQ at B and FG of AQ to intersect PQ at C.
Step13 – Join AB and AC.
Step14 – ABC is the required triangle.
Conclusion
The above example used all basic concepts of constructions, as listed below:
- Perpendicular bisector in which at a given point 90° is constructed and can be used to mark the midpoint of the given unknown line
- Angle bisector for dividing the angle into two congruent parts
- Parallel line construction at a given distance can be done with arc measurements from a given point
- The right-angled triangle can be constructed with the perpendicular bisector method
 Profile
 Settings
 Refer your friends
 Sign out


